

Floating vinyl flooring is a vinyl floor installed without permanently gluing or nailing the planks to the subfloor. Instead, the pieces usually connect through a click-lock system, forming a continuous surface that rests on top of a prepared base. The word “floating” describes the installation method, not a special type of vinyl.
Most products sold for this purpose are luxury vinyl planks (LVP) or luxury vinyl tiles (LVT), often with a rigid core. They imitate wood or stone, resist everyday spills, and can be easier to replace or remodel than some permanently bonded floors.
I think the key to choosing floating vinyl flooring is understanding both sides of the bargain: installation can be straightforward, but the floor still needs a flat, dry base and room to expand. Here’s what I would check before spending money on it.
How Does Floating Vinyl Flooring Work?
Each click-lock plank has shaped edges designed to join its neighbors. As the pieces connect, they create a broad surface that can move slightly with temperature changes rather than being fixed to the subfloor. Trim conceals the small space left around the room’s perimeter.
A typical plank includes a protective wear layer, a printed design, a vinyl-based core, and sometimes an attached backing pad. Some rigid-core versions use stone-plastic composite (SPC), while others use wood-plastic or polymer composite (WPC). Construction varies by brand, so I always treat the product specification sheet as more reliable than a store display label.
“Floating” does not mean the floor should bounce. If it shifts, separates, or clicks underfoot, the issue may be an uneven base, damaged locking edges, or an installation error.
Types of Vinyl Flooring Worth Comparing
Three floating options appear frequently in stores. A fourth, glue-down vinyl, is worth understanding because it solves different problems.
| Flooring type | How it feels and performs | Where I would consider it |
|---|---|---|
| SPC rigid-core click-lock | Firm, relatively dent-resistant core; less forgiving of uneven subfloors | Busy kitchens, hallways, and family spaces |
| WPC rigid-core click-lock | Often warmer and slightly more cushioned underfoot; can be thicker | Living rooms and bedrooms where comfort matters |
| Flexible click-lock LVP | Less rigid construction; product choice and subfloor preparation are especially important | Suitable residential rooms when approved by the maker |
| Glue-down LVP or LVT | Adhered to the base; not a floating installation | Large commercial areas or layouts requiring a bonded floor |
SPC and WPC aren’t automatic quality rankings. A well-made WPC plank can outlast a poorly manufactured SPC plank, and vice versa. The wear layer, finish, locking joint, warranty, and installation conditions matter as much as the core.
Be careful with the phrase “loose lay.” Some loose-lay vinyl uses friction-backed planks and may need perimeter or full-spread adhesive in particular conditions. It is not necessarily interchangeable with click-lock floating flooring.
What Are the Benefits of Floating Vinyl Flooring?
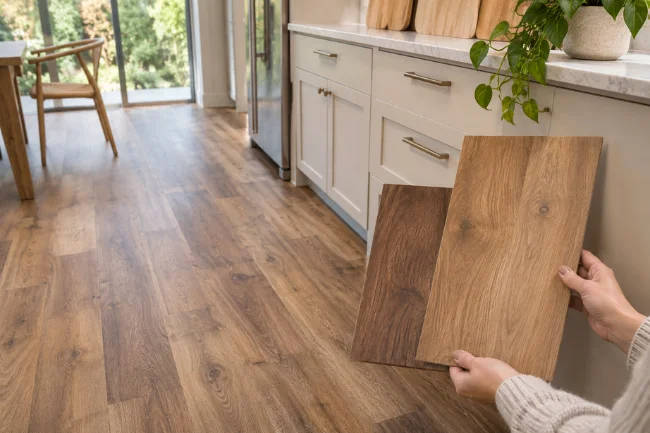
A Convincing Look Without the Upkeep of Natural Wood
Modern printing and surface textures create oak, walnut, slate, and concrete looks without the sanding or refinishing associated with hardwood. Planks with varied patterns and a matte finish often look more natural than repetitive, glossy designs.
I would bring a large sample home before choosing a color. A floor that looks pleasantly warm under showroom lighting can appear gray or orange beside your own cabinets.
Practical Water Resistance
Many rigid-core vinyl products are marketed as waterproof because water does not readily damage the planks themselves. That makes them useful for kitchen spills, damp shoes, and everyday cleaning.
However, water can still pass through perimeter gaps or collect beneath the surface. Waterproof planks do not automatically make a waterproof room, particularly where flooding, leaks, or persistent subfloor moisture are possible. COREtec’s installation guidance specifically cautions about moisture beneath waterproof flooring.
Less Disruption During Remodeling
A properly approved floating floor may go over existing tile or firmly bonded vinyl, avoiding some demolition. Click-lock installation also avoids spreading adhesive over the whole room.
That doesn’t make preparation optional. The original floor must meet the new product’s flatness, condition, and height requirements.
The Drawbacks I Wouldn’t Ignore
Floating planks can sound hollow over poorly prepared subfloors, and lower-quality locking joints may separate under movement. Sharp grit, dragging furniture, and concentrated loads can scratch or damage the surface even when the wear layer is thick.
Heat is another concern. Prolonged direct sunlight can raise surface temperatures and contribute to movement or discoloration. Mannington advises managing strong sunlight with blinds or curtains for its rigid vinyl lines.
Unlike solid hardwood, vinyl cannot be sanded and refinished. Individual planks may be replaceable, but getting to a damaged plank in the center of a click-lock floor can require dismantling several rows.
There is also a design limitation that gets overlooked: permanent kitchen islands, heavy built-in cabinets, and fixtures generally must not pin down a floating installation unless that specific product explicitly permits it. The floor needs freedom to move.
Where Does It Work Best?
Kitchens and Dining Rooms
This is one of my favorite applications to consider because wiping up crumbs and spills is simple. Choose a textured, easy-clean finish, protect chair legs, and install flooring around fixed cabinetry according to the manufacturer’s instructions.
Bedrooms, Living Rooms, and Hallways
Wood-look planks can visually connect several rooms. For upper floors, ask about the complete assembly’s acoustic performance rather than assuming an attached pad will eliminate footstep noise.
Hallways benefit from tougher surface finishes, but long runs and doorways may require transitions. Check the maximum continuous installation dimensions printed in the product guide.
Bathrooms, Laundry Rooms, and Basements
These spaces are possible only when the chosen product is approved for them and the subfloor is dry enough. I would avoid treating click-lock vinyl as a substitute for a shower waterproofing system or as protection against a known basement leak.
For laundry rooms, think about appliance vibration, moving heavy machines, and access to shutoff valves. Those practical details can matter more than the printed wood grain.
How to Choose a Floor That Will Hold Up
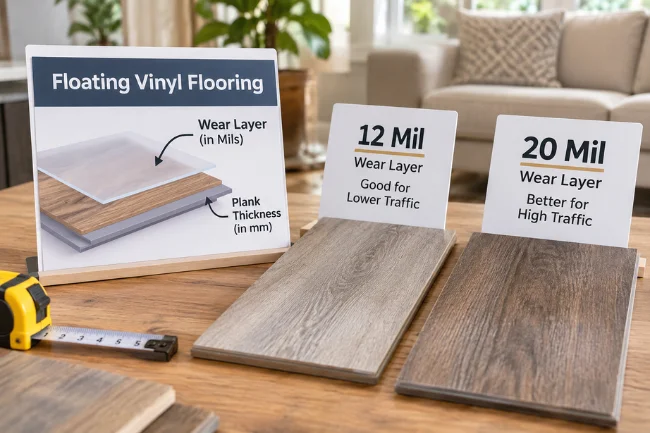
Look at Wear-Layer Thickness, Not Just Plank Thickness
Total plank thickness and wear-layer thickness measure different things. A 6 mm plank is not necessarily more scratch-resistant than a thinner one. The transparent wear layer is often listed in mils, where one mil equals one-thousandth of an inch.
For a relatively quiet bedroom, I would compare products around 12 mil; for an active household with pets, kids, or frequent guests, I would shortlist 20 mil options. Those are shopping guidelines, not guarantees of lifespan. The actual finish formulation and warranty exclusions still matter.
Check the Locking System and Backing
Examine a real plank edge, not just a product photograph. Thin or chipped locking lips deserve attention. If a plank comes with an attached pad, don’t automatically add a second underlayment; an overly soft layer can stress the joints, and some manufacturers prohibit it.
I also check the stated compatibility with radiant heating, room temperature limits, and required transition profiles. These restrictions vary across products.
Consider Indoor Air Quality
For shoppers concerned about chemical emissions, an independently verified FloorScore certification is a useful criterion. It indicates compliance with specified volatile organic compound emission limits, not that a floor is completely chemical-free or “non-toxic.” Check the exact product in the FloorScore certification information.
Use the Five-Check Sample Test
Before committing, I would assess a sample against five real-room conditions: daylight beside the window, evening artificial light, cabinet and wall colors, shoe-and-pet traffic, and the height needed beneath doors. A sixth check is worth making if the room has strong afternoon sun: ask whether the manufacturer’s temperature limits suit that exposure.
This small exercise often prevents a disappointing purchase more effectively than comparing dozens of nearly identical online photos.
Subfloor Preparation: The Part You Can’t Skip
The most common misunderstanding is that a rigid plank will flatten an uneven floor. It won’t. A hollow or raised area can place repeated pressure on the locking joint when someone walks over it.
Some manufacturers require subfloors to be flat within approximately 3/16 inch over 10 feet; others specify different tolerances. Use the limit for the exact product, not a universal rule. Shaw’s SPC installation instructions provide product-specific requirements.
Wood substrates should be secure, sound, and free from excessive movement. Concrete needs an appropriate moisture assessment, even when the vinyl itself is waterproof. Depending on the product and substrate, the instructions may require or recommend a compatible vapor retarder.
Existing tile can sometimes remain if it is firmly bonded and sufficiently flat. Deep grout joints may need filling. Cushioned flooring, unstable layers, and wet or deteriorating subfloors are poor starting points.
In older homes, never sand or grind unidentified existing resilient flooring. Some older flooring and adhesives may contain asbestos; arrange suitable assessment before disturbing suspect materials.
How I Would Approach the Installation
The product’s own instructions come first, because click systems, expansion allowances, acclimation requirements, and cutting methods differ. For a typical approved click-lock installation, I would follow this sequence:
- Measure and plan. Calculate the room area, then allow around 10% extra material as a planning estimate for cuts and mistakes; difficult layouts may need more. Check that the first and last rows won’t end up as narrow slivers.
- Inspect and prepare. Confirm the base is clean, dry, sound, and within the stated flatness tolerance. Address high spots and dips using approved methods before opening all the cartons.
- Check moisture and underlayment rules. Use the specified moisture test and vapor-control system where required. Follow the manufacturer’s instructions on attached pads or additional underlayment.
- Lay out and connect. Mix planks from several boxes for a balanced pattern. Stagger end joints as instructed, avoid forcing the locks, and inspect each completed row for gaps.
- Preserve movement space. Many systems call for roughly a 1/4-inch perimeter expansion gap, but some demand more. Keep the required clearance at walls, pipes, door frames, and fixed fixtures.
- Finish without trapping the floor. Attach baseboards or quarter-round to walls or other approved fixed surfaces, not through the vinyl. Fit transitions wherever the guide requires them.
I would stop the job if planks repeatedly refuse to lock together. Forcing them with the wrong tool may hide a damaged edge that later opens into a visible seam.
For kitchens, install permanent cabinets and islands before the floating floor unless the product documentation explicitly permits another method. Floor & Decor’s guidance warns that pinning a floor beneath fixed units may affect its warranty.
How Much Does Floating Vinyl Flooring Cost?
Prices depend on brand, core, design, wear layer, location, and the condition of the existing floor. For context, HomeGuide’s U.S. vinyl flooring estimates put many vinyl plank materials in the broad range of roughly $2–$10 per square foot, with installation adding to the total. Actual floating products and local quotes vary.
Here’s a sample budget for a 200-square-foot room. The unit rates are illustrative, not a quote, and the estimate assumes 10% material waste.
| Cost component | Example calculation | Estimated cost |
|---|---|---|
| Vinyl planks | 220 sq. ft. × $3–$6 | $660–$1,320 |
| Professional installation labor | 200 sq. ft. × $3–$10 | $600–$2,000 |
| Combined materials and labor | Before preparation and extras | $1,260–$3,320 |
Removing old flooring, leveling, moisture remediation, door trimming, transitions, and baseboards may increase the price. Taxes and local labor rates are not included in that example.
DIY installation can reduce labor costs, but I wouldn’t make that decision until checking floor flatness and moisture. A bargain plank installed on a bad base can become an expensive repair.
Keeping a Floating Vinyl Floor Looking Good
Sweep or vacuum with an appropriate hard-floor setting so sand doesn’t act like sandpaper. Wipe spills promptly and clean with a manufacturer-approved product using a damp, not soaking, mop.
Use non-staining mats, broad furniture protectors, and suitable moving boards under heavy appliances. Avoid abrasive cleaners and wax unless the specific product allows them. Steam-cleaning rules vary: some lines permit approved residential steam devices, while others restrict them, so check first. Mannington’s maintenance instructions illustrate why brand-specific care advice matters.
If you notice a new gap, raised edge, or persistent clicking noise, investigate early. Possible causes include a damaged joint, moisture, an uneven substrate, or furniture that is preventing movement. Covering a symptom with trim or adhesive doesn’t fix the underlying issue.
Is Floating Vinyl Flooring Right for Your Home?
I would choose floating vinyl flooring when I want a low-maintenance wood or stone look, the room has an appropriate subfloor, and the product’s installation limits fit the layout. I would reconsider it where leaks remain unresolved, high heat is unavoidable, or permanent fixtures will trap the surface.
Start by ordering full-size samples and reading the exact installation and warranty documents. Then check the subfloor before comparing final quotes. Those three decisions do more to protect the finished result than choosing a color alone.
Frequently Asked Questions
Does Floating Vinyl Flooring Need Underlayment?
Not always. Many planks already have attached backing, and extra underlayment should be used only when the manufacturer permits it.
Can Floating Vinyl Flooring Be Installed Over Tile?
Often, yes, if the tile is secure, dry, flat, and properly prepared. Deep grout joints or damaged tiles may require repair first.
Is Floating Vinyl Flooring Completely Waterproof?
Many planks resist water, but the entire floor assembly is not automatically waterproof. Water can still reach seams, edges, or the subfloor.
How Long Does Floating Vinyl Flooring Last?
Lifespan varies with product quality, wear, installation, and care. Compare the precise warranty terms rather than relying on a promised number of years.
Can Heavy Furniture Sit on Floating Vinyl Flooring?
Ordinary movable furniture is usually fine with suitable protectors. Permanent cabinets or islands generally should not pin down the floor unless specifically approved.